Land Navigation: Basic Understanding
Land nav skills? Who needs that? Just follow the blue dot on your phone! We all have a phone with GPS, so why’s it important to understand how to navigate?
Believe me, I’ve thought the same from time to time! We get lazy and rely on technology. I’d like to explore the most rudimentary basics of analog land navigation through a real-world scenario. After that, we’ll cover one situation I found myself in, when I was glad to have a basic understanding of land navigation. My technology died when I was seven miles deep into a blizzard in grizzly bear country.
Real-World Scenario
Let’s look at a realistic scenario that’ll illustrate how getting lost could happen to any of us.
John Doe is out hunting mule deer. He has studied OnX and plots a point that he wants to reach to set up camp. He starts his hike on a nice trail but eventually he has to wander off trail to reach his destination. As the sun goes down, Mr. Doe is just looking at OnX and
checking contour lines to make sure he’s not crossing canyons as he keeps walking
towards his marked spot on the OnX map. John arrives, sets up camp, hunts for several days and harvests a buck.
He packs up camp and is ready to start his journey back to the truck. He needs to navigate back safely. With him, he has –
Three Examples:
- Nothing (worst case) - No technology (phone/gps dies, no map, no )
- Compass and map (not a bad situation if you know how to use it) - No technology (phone/gps dies)
- Technology (easy day) - But don’t be complacent
Example 1: Nothing
If John Doe has nothing to navigate with, the above tricks are going to be his best friend. John needs to stay calm and plan before making rash decisions. Use the acronym STOP (Stop, Think, Observe, Plan).
John needs to think:
- Is it safer to stay put and signal or start my journey back to the truck?
- In what general direction did I travel to get to camp from the truck?
- In what general direction did I travel from where I broke off of the trail and started bushwacking towards where I set up camp?
- How much daylight do I have before I need to set up camp again?
- How much food and water do I have?
- Did I travel along a creek or an obvious ridgeline?
If John cannot relocate the trail, he needs to go back to his original campsite. He now has two options:
A. Dead Reckoning
You move by:
- Following a precise direction (bearing/azimuth)
- Tracking exact distance (Pace We’ll talk about how to establish your pace count later)
- Moving in a straight line toward a point
Pros: simple, works in low visibility
Cons: small mistakes compound over distance, hard to travel in a straight line in wooded or mountainous terrain
B. Terrain Association
You navigate by:
- Reading terrain features
- Following ridges, valleys, handrails
- Using prominent features as guides
- Constantly comparing memory of terrain to what you see
- Example Terrain Features found on a contour map:
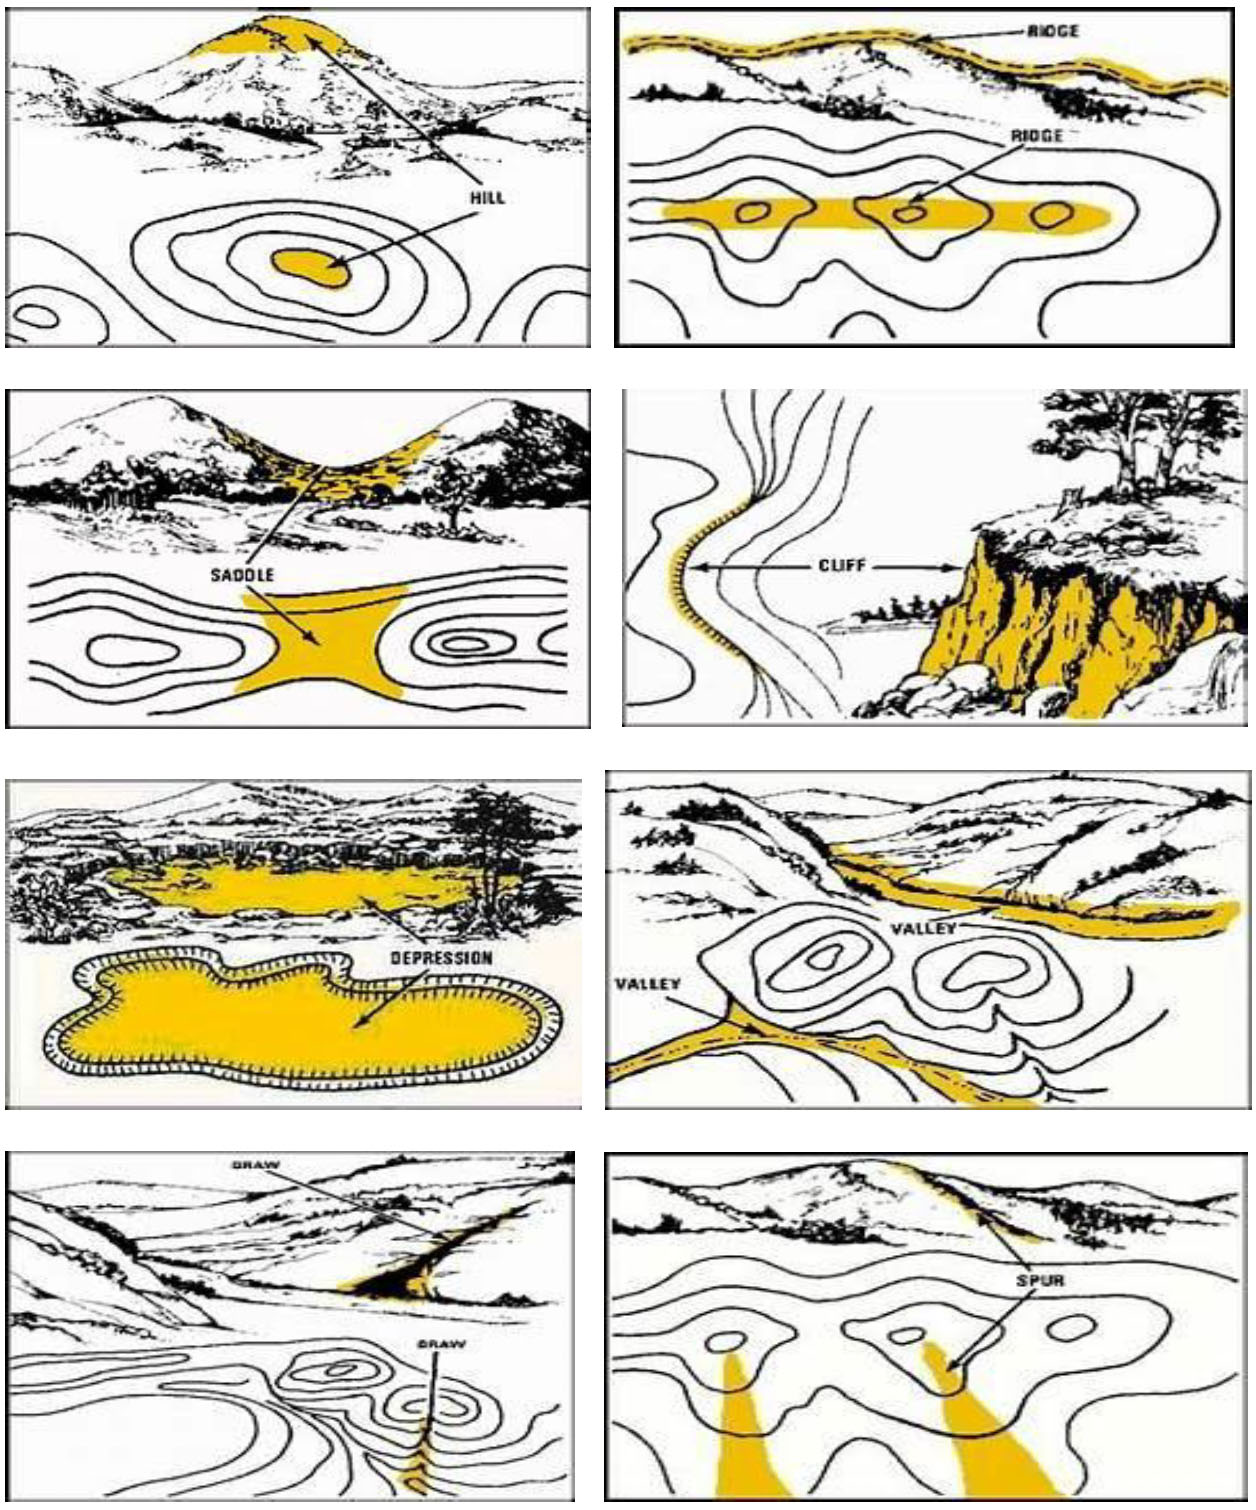
Quick Note: The “draw” featured above is where water would flow, for example. It’s basically low, eroded ground on the side of a hill. If you’re walking down a hill, you’re almost always going to walk down the spur (also known as a finger) because it is easier vs walking down a draw which is typically full of deadfall, rocks, thick vegetation, water, etc.
Pros: more forgiving and efficient, can change direction for ease of travel as long as you can find those prominent land features again
Cons: requires visibility and understanding of the land
Example 2: Compass and Map
The first thing John should do is STOP (Stop, Think, Observe, Plan. More on this later). From there, the easiest thing for John to do is mark two points on his map.
- His current location
- The location he left the trail to start
This is the easiest way out: find the trail and follow it out. What people don’t realize is that using a compass and a map takes some skill, knowledge and even math!
If John could not find the trail and needed to navigate back to his truck using a compass and a map, he would need some experience to do this efficiently.
To rely on a compass and a map for navigation you need:
- An accurate compass
https://cammenga.com/products/phosphorescent-lensatic-compass-27-coyote-brown - A good topographical and gridded (MGRS) map that is laminated for weather
https://mapstore.mytopo.com/ - Protractor that matches the scale of the map you’re using
https://battleboard.us/products/map-protractor?variant=34932396556439 - Fine point map pens
https://www.michaels.com/product/staedtler-lumocolor-nonpermanent-markers-super-fine-set-of-4-177077550791360537
Without doing a full blown land navigation and mapping class, here are the main things you need to know when navigating while using a map.
- Reading map terrain features (Hills, Valleys, Saddles, Fingers, Draws)
- Reading map contour lines
- Knowing how to convert “Magnetic North” from your compass to “Grid North” to apply to the map.
- Know how to use a navigation protractor
- How to shoot an azimuth
- How to shoot a back azimuth
- How to triangulate your own position (Be able to use known landmarks and shoot back azimuths to find exactly where you are on the )
- Know your pace count
- Know your natural line of drift (For me - for every 100 meters, my natural line of drift is 10 meters to the Therefore, if I shoot an azimuth and follow that azimuth using dead reckoning, and I travel 500 meters - I know that when I reach 500 meters, I also need to turn to the right and walk 50 meters (10 meters for every 100 meters I traveled) to get to my point that I plotted on the map).
- Know how to identify and use backstops (A backstop is something that tells you, you’ve gone too far - Road, river, cliff band etc…)
The list above is incomplete, but it includes the basics. This type of land navigation takes some practice and some skill. It isn’t hard. You just need knowledge and practice.
Example 3: Technology
OnX has been the best tool I’ve used for simple land navigation use, but getting complacent and just looking at a blue arrow/circle on a screen can get you in trouble.
Whether you’re hiking with the family, or on a hunt by yourself, you should always do a little recon of the area.
OnX - Be sure to use tools such as slope layers and topo lines to see elevation gain/loss, make preplanned checkpoints, etc.
Garmin inRreach or similar - Make sure this is charged and subscription is active.
Here are some big tips when planning/starting your hike using OnX and or your Garmin inReach or similar.
Tracker - turn the tracker on for information like - how far you’ve traveled, what your pace was, how much time it took, and obviously a bread crumb trail right back to your starting point
Download maps /offline mode - There will be a lot of places you go that do not have service. Download the map/maps of where you’ll be traveling on OnX before you lose
service. This way, when you do lose service, you still have a very detailed map to reference. You will literally be able to see big boulders, old trees, or even prominent bushes to know exactly where you are or where to get to.
Bring an extra battery pack - Solar powered is the way to go. Have a full charge on your extra battery already, but have the ability to charge using solar - cold weather will zap your battery pack to zero in a hurry, so it’s not a bad idea to keep electronic devices in a base or mid-layer chest pocket.
Let someone know where you’re going - Always let someone know where you’re going and when they should expect you back. This way they have a time and a place to start looking.
Preplanned texts - Not a bad idea to have preplanned texts set up in your inReach that you can send every evening to your loved ones. This is easy to set up and provides a lot of peace of mind.
So we’ve looked at navigating with a variety of tools we may or may not have onhand. Being able to navigate doesn’t do you much good if you can’t survive while navigating. So here are some great survival basics pertaining to navigation. These skills aren’t perfect in every scenario, but they can save your life.
STOP (as previously mentioned)
Keeping your composure in potentially dangerous scenarios isn’t just hard, but it’s critical for your survival. STOP is an acronym:
- Stop
- Think
- Observe
- Plan
There’s nothing earth shattering here, but that’s the beauty of it. STOP is a reminder to pause what you’re doing, be present and mindful, settle your nerves, take stock of your surroundings and the items you have in your possession, and plan your next move. Another way to look at this is to quit digging when you’re already stuck in a hole. Do not make a scenario worse by being in a panic.
Direction
It’s impossible to determine where you are if you don’t know which direction is North. Here are two scenarios to determine which way you’re looking. Keep in mind that these methods are rough, not exact.
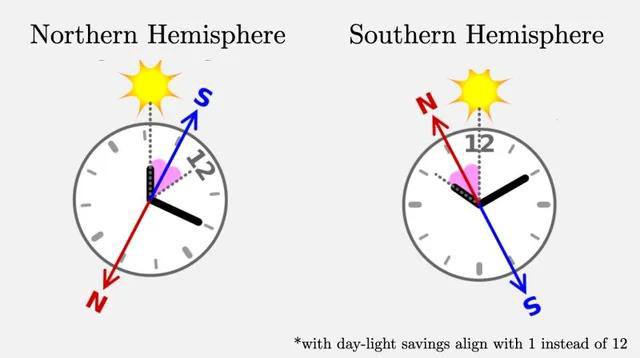
- Analog watch method: If you’re in the Northern hemisphere, point the hour hour-hand of your analog watch at the sun. If you’re in the Southern hemisphere, you align the sun with 12:00, and North will be halfway between 12:00 and the hour hand.
- Stick and shadow method: Place a stick in the ground high enough that it casts a shadow. Place an item such as a rock on the tip of the That is your “Western mark”. Wait for 15 minutes to allow the shadow to move to the East. After 15 min place another rock at the tip of the shadow. This is your “Eastern mark”. Now place a stick or draw a line between the two rocks. This is your West and East - therefore, you can now place a stick perpendicular to your West/East line and that will be your “North/South mark”.
Although these methods don’t give you a perfect azimuth, they can give you a general direction.
Sunlight / Remaining Light
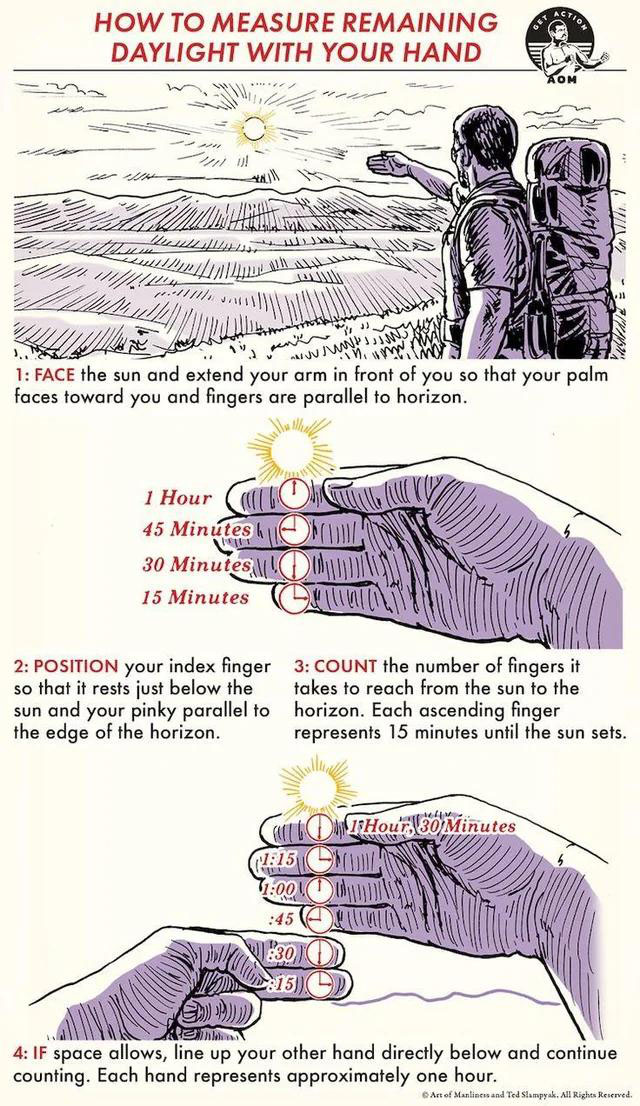
- To determine how much sunlight is left in the day, you can place your hand horizontally out in front of you and count how many fingers take up the space between the sun and the Each finger represents about 15 minutes. 2 fingers - half an hour. 4 fingers - 1 hour, etc. Keep in mind that this is a very rough estimation. This method is useless at extreme latitudes, like northern Alaska.
Distance Travelled
One way to determine how far you’ve traveled is by counting strides, often recorded with a pace counter (or Ranger) beads. Otherwise, you can simply keep track in your head.
In order to determine distance by counting strides, we need to figure out how many steps you have to take in order to walk 100 meters. We all know that 1600 meters = one mile, therefore by knowing our 100 meter pace count, we have a general idea of how far we’ve traveled. The best place to do this is on a track & field track. Start walking and count every other step. So if you take your first step with your right foot, count every time your left foot hits the ground.
My pace count is 56. Every 56 left-foot steps or 112 total steps I take, I’ve traveled approximately 100 meters. The reason we count every other step is because it’s easier to lose track the higher you count. That means I need to count 896 steps to travel one mile.
This takes a few repetitions and isn’t always going to be perfect based on terrain, uphill downhill, how much weight you are carrying, how tired you are, etc. You can test all these things, but as a general rule of thumb, if you’re going down hill, you’ll need to take less steps to travel 100 meters and as you travel uphill, it’ll take more steps.
Basic Signals
In the event you’re injured or hopelessly lost, staying put and signaling may be your best option. Here are some ways to draw attention to yourself.
- Search and rescue recognizes anything in a series of
- Three whistle blasts
- Three fires
- Three flashes of light
- Three rifle shots,
- Fire
- The darker the smoke, the more obvious the Get a fire started, then add wet/live items such as pine branches or wet leaves, etc. This will change a dry white smoke to a dark smoke.
- Markings
- SOS, if possible, is obviously a sign that you are in distress
- A big X is the symbol for needing medical assistance
- An arrow to show direction of travel
My Story:
I was elk hunting in the Rocky Mountains. It was November and very cold - around 20 degrees. I had done some route recon and downloaded maps on my OnX, and even packed an extra battery pack. I hiked in 7 miles and set up camp.
I hunted for 2 days when a bad winter storm came in, so I hunkered down in my tent to stay warm. I woke up early the next morning to find the snow nearly covered my tent. It had snowed around two or three feet and was still coming down hard.
I was exhausted from the hunt, and chilled to my core. I decided I’d hunt that morning before heading back to the truck. I looked down at my phone to find I had about 20% left on my battery, as well as another full charge on a battery pack stowed in my pack. I had put it on airplane mode at the beginning of the hunt and only used it for navigation.
I hunted that morning and was unsuccessful, so I headed back to pack up camp. When I arrived at camp I saw that my phone was completely dead. No problem - I have another full charge on my battery pack. Except I didn’t. The cold had zapped all charge from my phone and my battery pack. I was without any technology, I had no map, I was cold, exhausted, and snow kept piling down.
A little bit of panic came into my subconscious, but I stayed calm and used my brain. I had a few things in my favor.
- I knew my truck was down by a main river that leads into a town that was about 30 miles
- I had plenty of food and water, and a tent on my
- I had hiked in on a trail so I should be able to find that trail to make my way
- My family knew where I was going to be hunting and the day I planned to
After packing up camp, I found the closest terrain feature I knew that was near the trail. It was a large boulder that I remembered the trail wrapping around. I went there and found the trail. It was very faint, merely a small depression in the two feet of snow where the trail was, rather than the 2 - 3 foot of snow that blanketed the ground elsewhere.
I knew the direction I needed to go, so I followed the depression of snow until I was going through some deadfall and could not see the trail again. Panic again tried to slip into my mind, but I pushed it away and stopped to gather my senses. What I remembered was the trees that had been saw-cut by state or federal groups that maintained the trails in order for the trails to be passable.
I knew I could stay on trail as long as I could brush the snow off and see that the trees were saw-cut. The problem was, it was now starting to get dark, it was getting colder, and more snow was coming down. I kept my headlamp off as long as I could, and I spent the next few hours moving slowly down the trail by digging out downed logs to see saw marks or broken trunks.
Each time I found a broken trunk, I returned to my last known spot using my tracks in the snow. This took a lot of attention to detail and trudging through the snow which was mentally and physically exhausting. What I had though, was a safety net. I knew I had food and shelter, and my family knew the area I was hunting in, and that my truck was at the river. This kept me calm. I knew that if all else failed, head south and downhill until I hit a large river. From there I could walk towards town and either find my truck or find town.
To keep this story short, it was a lot of that; losing the trail, scraping logs, finding the trail, trudging on until finally I came to more obvious trail markings and could hump it out from there. When I reached my truck, I ate, thanked God for guidance, and headed home. That week I bought a Garmin inReach and a solar battery pack - for better battery life and an SOS button.
That story probably doesn’t sound scary from the outside, but the things that were going through my mind, the panic I kept at bay, and the physical and mental exhaustion all played a part in the way I now plan and prepare for hunts/hikes with family.
It is important that we respect how unforgiving nature can be and prepare for our own sake and our family’s sake. Stay safe!